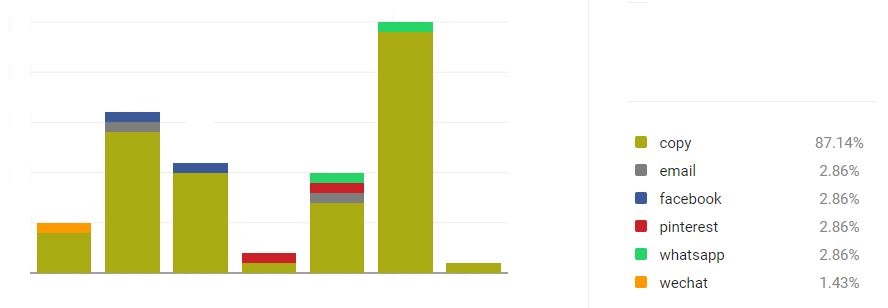
The last time we checked, 87% of our active visitors copied content from this site without acknowledgement.
This helps us know that we are doing things that interest you.
So, give us a smiley before you go.
 |
www.moyoway.com |
 Buy your Certified Organic |
|

|
|
CLICK FOR NAKED www.moyoway.com |
Moyo is an African origin word which implies that the
"heart and mind act as one to cultivate the spirit”
Expelling Moringa Oil
>Home Page >>Au Natural >>>Natural Resources >>>>Moringa Oil Expelling
|
Using the small sample of seeds that we had (pictured below), we tested the PITEBA oil expeller. PITEBA had no best practice guide for this seed type and so this exercise was bit of an experiment. |
|

First we setup a strong base for the expeller to be bolted onto.
Moringa seeds are soft so we did not expect too much resistance from the handle. But an important part of the expelling process is not to stop turning the handle.
If this happens, the pressed cake hardens and the device will get stuck.
Ensuring that the device is very secure will make the expelling less troublesome.

Setting up the exit point of the pressed cake proved to be tricky. With no best practice guide from the manufacturer, we had to guess a little. There are 3 main settings of the bolt that controls the pressure of the pressed cake exiting the device.
The first setting is when the bolt is almost closed. This creates maximum pressure because the exit holes on the reducer are only slightly open.
(If left closed during the expelling process, the risk here is that the device will crack from the extreme pressure of the pressed cake trying to get out)
The next setting is when the bolt is open to its maximum. This exposes the 2 exit holes on the reducer to their maximum.
The last setting is when the bolt is completely removed. This allows the least amount of pressure.
The settings will change according to the seed type and condition, so expect fine tuning during the expelling process to find the optimum extracting setting.


The PITEBA manual is excellent and the website is very informative on how to operate and troubleshoot the expeller.
However, as Moringa had not been expelled before by the manufacturer, the purpose of our test was to learn the best way of expelling Moringa oil using this device.
We searched the web to see if anyone had used the PITEBA to extract Moringa and while there was some reference of people doing it, nobody had shared their best practice principles.
Unfortunately, we only had 123 grams of decorticated seed to use, so our test was not as thorough as it could have been.
This is what we found using decorticated seed
The decorticated Moringa seeds tended to be a little sticky in the funnel. They would build "bridges" and had to be continually prodded with a rod to make sure that they entered the screw cavity.
Lesson learned for next time :
- Have a clean wooden stick handy (about 5 to 10 mm in diameter)
- Have another person to help with the prodding
- Try using undecorticated seed (with the shell still on)
The expeller was bolted at the bottom of the frame. During turning of the handle, we found that the chassis (or frame) tended to twist.
Lesson learned for next time :
- Bolt the chassis on the back. The twisting pressure originated from the handle which is directly connected to the vertical part of the chassis. Securing this side will be a better option next time.
From the pictures, you can see that the base looks extremely strong. But it was not perfect. It was not properly attached to the wall and it moved while turning the expeller handle.
Lesson learned for next time :
- Take the time to build a very secure base or frame to attach the expeller. Dealing with a wobbly frame during expelling is dangerous. Your hand may slip off the handle or the device may come loose or the flammable liquid in the heater bottle may break away from its tether.
We struggled to find the optimum setting for the bolt that regulates the pressed cake exiting the expeller - this is also very important for the oil flow.
We started at the tightest point and while monitoring the pressure of the handle (too much pressure would mean that the bolt is too tight and the flow of the pressed cake is restricted) and watching the exit of the cake, we gradually loosened the bolt.
After about half the seeds had been pressed, the first bit of oil started to exit the expeller. At this point, the bolt was about halfway (the exit holes where about half open). We continued to loosen the bolt and eventually removed it completely.
By this time, we had run out of seed.
Lesson learned for next time :
- We will start with the exit holes half exposed. We think the optimum setting is between half and fully open. (for decorticated seed)
- We suspect that for undecorticated seed, the optimum position will be for the exit holes to be fully open.
We wanted to use a standard laboratory beaker to collect the oil. It turned out that the beaker was too large and a quick makeshift plan using a narrower glass was not the best choice either.
Lesson learned for next time :
- Have the entire expeller properly and completely set-up prior to lighting the heater.
- Due to the twisting of the frame, the glass would move and had to be continually re-centred. We would either secure the glass or install a funnel.
Consistency is an absolute key to success and the way to be consistent during the expelling process is to have help on hand and have everything ready and close by should something need to be changed or adjusted.
Once the cake hardens, it is like a rock.
Lesson learned for next time :
- Use bolts that will allow quick removal of the expeller after use.
- A bucket nearby with very very hot water for the expeller to be placed into after use. Cleaning the expeller and removing the hardened cake from all the threads takes way too long if it is allowed to get hard.
We took about 15 minutes from the time the expelling was finished to the time the expeller was dismantled for cleaning.
The reducer had to be immersed for a few minutes of soaking in boiling water about 5 times before we could start to pry the pressed cake loose - this error on our side was very frustrating and time consuming.
The oil exit slits would clog up. While the manual makes specific reference to this occurrence having a helper on hand to watch and clean the slits would have helped significantly.
Lesson learned for next time :
- I am sure that the device can be efficiently operated by a single experienced user that is familiar with the seed type and process. But for a new user experimenting with new seed types, having another person to help would go a long way.
This is what we found using shelled seed
The experiment did not work at all. The seeds were too large for the throat and would not move down to the screw unless continually prodded.
The process was simply too intensive for a smooth operation and we decided to abandon any further testing.
We emailed the supplier and he confirmed that others were successfully using the press to extract Moringa oil. We asked for their contact details so we could communicate with these people and find out if we could improve on our method and technique.
Unfortunately Piteba did not respond to our email.


What was left behind after the test (decorticated seed)
Depending on the setting used (bolt either on or off), there are 2 types of Moringa seed cake that you will be left with.
The first type will be the thin "spirals" from where the seed cake exits the reducer (See the picture below and look at the right side of the reducer - you can see one of the small exit holes. Also, the black adjustment bolt is clearly shown)

The "spirals" are very thin and break easily into small pieces. Look at the picture above, the plate at the top right, this is what the pressed "spiral" cake looks like after it has been broken up into small pieces using your hands.
The plate on the left is the pressed cake that results from the black bolt being completely removed during the expelling process. It is a much chunkier and, although very hard, it is very brittle and breaks up easily.
This pressed cake now has a number of other uses. Since the oil has been extracted, it can be added to animal feed.
It can also be added to composts or used as a mulch directly in your garden.
What we liked about this experiment (decorticated seed)

None of the pressed cake is wasted and it will go on to benefit other aspects of animal and plant production.
No electricity was used.
We extracted a high value product that can be sold on to the cosmetic industry or used as a high value vegetable lubricant - Ben Oil - because of its high Behenic Acid ratio.
It shows great potential for the DIY enthusiast who enjoys making their own products.
But, of course, its biggest advantage are the opportunities that it offers poorer communities to harvest a very valuable product that is accepted and used almost all over the world.
The Moringa tree is a sustainable produce. It makes a highly enriched food supplement for humans, animals and plants themselves ... needs no GMO ... and still provides a little more, the Miracle Oil.

Expelling Moringa Oil (Back to Top)
Moringa Oleifera - A Modern Day Building Block


Look Around
|
Home |
Causes |
|
Site Map |
Search |
|
Latest Pages |
RSS Setup |
|
Google+ |
Facebook |
|
Twitter |
Pinterest |
|
Help |
Downloads |
|
Contact Us |
About Us |
Recent Articles
-
Naked Organics, Organic Infusions and Tisanes
Naked Organics is Moyofarm's retail brand to buy highly nutritive certified organic foods at wholesale prices via Amazon EU -
Submission for Fu-Qu Competition from MM Cosmetica #2
We don't believe that natural products should come at a premium. It suggests that products produced with chemical additives is now normal. That sounds -
GMO Food information that you will not find in mainstream media
GMO Food is the rosy looking oversized bright red strawberry on the shop shelf, but, behind the strawberry is an unproven science that is NOT "substantially equivalent" nor a food material that your g…
Sage Advice

Avoid advertising in every possible way. Inform yourself and you will always find exactly what you are looking for
Safer Ecosystem

For the sake of a safer user and advertiser ecosystem, this website is Google Ad Free
|
|

Top of Page |
Enjoy this page? Click & share using the icons below
|
Global |
Site |
Search |
Latest |
Help |
Downloads |
Contact |
About |
Enjoy this page? Click & share using the icons below
Love life, live well, keep it real and trust your own common sense!
Motivate yourself with the 4 system properties of agroecosystems: productivity, stability, sustainability and equitability
© Copyright www.moyoway.com, 2011 - 2018, Click here for Disclaimers, Copyright & Terms of Use, Author - Marcel Blankenstein